
 Hat Band for Steven's leather hat. Attached, boxed and mailed today. It should arrive in Virginia in two to three days. I can't wait to get a photo of it on Steven's head! And yes Alpaca lovers, this is the second time I have felted with this fiber. It is very fuzzy! great for the band that gets to replace a furry fox band!
Monday, October 21, 2013
To-Do List # 1 (Done)
Hat Band for Steven's leather hat. Attached, boxed and mailed today. It should arrive in Virginia in two to three days. I can't wait to get a photo of it on Steven's head! And yes Alpaca lovers, this is the second time I have felted with this fiber. It is very fuzzy! great for the band that gets to replace a furry fox band!Doggie Sweaters

Thursday, October 17, 2013
To-Do List #2 & #3


Did I mention that I have weekends back again? And when one is motivated, how much one can actually get done over a weekend?
#2
I have had this bolt of turquoise fabric I won as a final contestant in the Norwalk Sofa Design Contest two years ago! Wow yes, that was two years ago when I met Candice Olson. So I finally made something of the 8 yards a fabric; a beautiful slipcover (shown here un-hemmed and missing a couple of little zips), for Buddy's chair in the kitchen. The throw on it's arm is from last year's Threshold Collection of home decor at Target, and my inspiration point of colors to pull together for the porch and kitchen colors, the wall color - a coral rose - while looks OK needs repainting and will become more of a cantaloupe color, the two back pillows are my OLD Festive Fibers products, KNIT pillows, which frame a beautiful pillow I have had on my Etsy shop. That felt piece for the pillow front was actually a demo felt I did during a class at NEFS.
#3
Studio chairs: I have owned these funky wooden dinette chairs since I was in college. I bought the set at a HUGE Salvation Army in Queens NY. The furniture part was like a 3 floor warehouse - amazing. They have been my kitchen chairs in many lives - 93rd St., Edison, and now Alstead. Whenever the mood struck I changed the fabric slip seats, and about 15 years ago they were relegated to being my studio chairs. I have never painted them, until now. I have a great color scheme in mind for my studio redo (another # on the To-Do List), and I had this pile of samples which I cut and sewed into patchwork.

Here are the chairs, either trash or re-cycle?...

Very cool, as this is the first time I ever noticed the inventory dates on the bottoms, all starting at 1958-1960, and believe me they had at lease 6 layers of slipseat covers, one stapled right over the last. Not any more, that old stuff removed completely and then a coat of fresh coral paint and some spray polyeurethane, can you say...

Fabulous!

What do you think?
Wednesday, October 16, 2013
To-Do Lists
Wow the last post date was a long time ago! Well a lot of life has certainly been happening, good things all, but it has made my posting time fall to the way side. So no more time to spare, in the next couple of weeks I will catch you up with all the things I am finally catching up to!
Do we all have To-Do Lists? The Oxford Dictionary says:
noun
I tend to agree with this definition, especially the part about organized in order of priority. It is a beautiful thing when we are flexible enough to reorganize these lists without too much internal angst. So as I have begun to chip away at my to-do list it really is not in any particular order, but boy oh boy, is the sense of checking something off exhilarating! Bam! You're done! In second grade, Mrs Ceretto gave us gold stars for doing the things we were supposed to do. In my niece's first grade class they get a certain colored card at the end of each day based on a day well done (behaved, homework done etc) or not so well done; green, yellow and red.
So one of the few things on my list has been to make a new hat band for a dear art friend, Steven Summerville of Virginia's Dream Pottery. (if you visit his facebook page you will see why we love each other!) Well, more than a year ago, Steven asked me if I could make a new band for a favorite hat. His doggie chowed on the original a fox fur. The hat being a favorite he wondered if I might I use fiber from his beloved alpaca Kaboodle, who had passed away the year before. I said "Steven, I would love to do this for you as long as you are not in a rush, as my life is so full." No problem Nicole no problem...well sadly I missed last year's cold winter season, and darn-it I refuse to miss this year. While we had a couple of chilly mornings here in NH, I know it is still on the warm side in Bumpass Virginia! So Steven, here it comes.
Here are a few pictures of the band being laid out, I will felt it probably tomorrow, and will then attach it to the cap style hat. I hope it comes out like it looks in my head... I want to stuff it as I attach it so it has some depth and roundness, as it is replacing a fluffy foxy fur, so I want to keep that silhouette. Steven, as you can see you have Buddy's approval! (By the way, this is the first time he has been with me when I lay out fiber in the studio, he was very very interested in what that fuzzy stuff was, sticking his head into my bins I had on the floor, where as his usual position he takes in the studio is upside down sleeping on a chair) I will felt this in the next day or so, and then attach the band to the hat, I hope just in time for the real cold that comes this time of year!


 I will post a couple of more pictures as the hat finishes.
Do we all have To-Do Lists? The Oxford Dictionary says:
Definition of to-do list in English
to-do list
Syllabification: (to-do list)
noun
a list of tasks that need to be completed, typically organized in order of priority
I tend to agree with this definition, especially the part about organized in order of priority. It is a beautiful thing when we are flexible enough to reorganize these lists without too much internal angst. So as I have begun to chip away at my to-do list it really is not in any particular order, but boy oh boy, is the sense of checking something off exhilarating! Bam! You're done! In second grade, Mrs Ceretto gave us gold stars for doing the things we were supposed to do. In my niece's first grade class they get a certain colored card at the end of each day based on a day well done (behaved, homework done etc) or not so well done; green, yellow and red.So one of the few things on my list has been to make a new hat band for a dear art friend, Steven Summerville of Virginia's Dream Pottery. (if you visit his facebook page you will see why we love each other!) Well, more than a year ago, Steven asked me if I could make a new band for a favorite hat. His doggie chowed on the original a fox fur. The hat being a favorite he wondered if I might I use fiber from his beloved alpaca Kaboodle, who had passed away the year before. I said "Steven, I would love to do this for you as long as you are not in a rush, as my life is so full." No problem Nicole no problem...well sadly I missed last year's cold winter season, and darn-it I refuse to miss this year. While we had a couple of chilly mornings here in NH, I know it is still on the warm side in Bumpass Virginia! So Steven, here it comes.
Here are a few pictures of the band being laid out, I will felt it probably tomorrow, and will then attach it to the cap style hat. I hope it comes out like it looks in my head... I want to stuff it as I attach it so it has some depth and roundness, as it is replacing a fluffy foxy fur, so I want to keep that silhouette. Steven, as you can see you have Buddy's approval! (By the way, this is the first time he has been with me when I lay out fiber in the studio, he was very very interested in what that fuzzy stuff was, sticking his head into my bins I had on the floor, where as his usual position he takes in the studio is upside down sleeping on a chair) I will felt this in the next day or so, and then attach the band to the hat, I hope just in time for the real cold that comes this time of year!


Tuesday, March 5, 2013
The Printmaking Begins! Experiment #1
Here we go, I had a very productive day last week and am pretty pleased with my first trial. I definitely learned a few things, and as students of mine know from classes I teach, have given myself a healthy bit of self-critique. To coin Martha, "It's a good thing" (critiques, that is!)
As my inspiration was wood block printing, which I am still planning on doing, I thought it very efficient to try the block carving and printing using a much easier type of block to start.(mostly at the moment my spare time is so limited I am purely thinking of efficiency) So I used rubber blocks. They are super fast to cut and I can do the preliminary technique trials on them and then get into the wood idea - that pulled me into this new (but not foreign for me) medium - as I feel more confident. In all color theory classes I teach I always encourage students to get to know the color range of your medium; watercolors, dyes, fiber, oils, pencils, whatever the medium, do some sort of color trials. This is to know where your tubes or tubs of pigments will take you. (I look for restrictions too, can I get my favorite brights? Is color clean? and if not I try to find a different brand or do some more blending)


As my inspiration was wood block printing, which I am still planning on doing, I thought it very efficient to try the block carving and printing using a much easier type of block to start.(mostly at the moment my spare time is so limited I am purely thinking of efficiency) So I used rubber blocks. They are super fast to cut and I can do the preliminary technique trials on them and then get into the wood idea - that pulled me into this new (but not foreign for me) medium - as I feel more confident. In all color theory classes I teach I always encourage students to get to know the color range of your medium; watercolors, dyes, fiber, oils, pencils, whatever the medium, do some sort of color trials. This is to know where your tubes or tubs of pigments will take you. (I look for restrictions too, can I get my favorite brights? Is color clean? and if not I try to find a different brand or do some more blending)


So things I tried and learned. First was don't forget to flip your tracing (to reverse it) While this scene looks basic, for many folks it really is an actual scene on Monhegan Island. oops! But for my first trail no big deal. Second, I tried brushing the color, watery, onto the block with brushes, but it was too soft -and while that can be pretty it was not the look I was going for. So since I couldn't find my brayer, (I have one, just where it was? well you know how that goes) I used a sponge.

Third is, find all your tools! I don't mind the spongey quality of the inks but also not the look I am going for, so I went out and bought another brayer. I plan on using the same block later in this week to try more color blending, so I will post the next grouping. I also want the stamping elements (the little red flowers) to be more opaque. I am using all water based inks and acrylics, so we will see how this works out.
Wednesday, February 27, 2013
Printmaking and Textiles
If you have been following my ruminations here and on the Festive Fibers Facebook page, you will notice my newest interest in the medium of Printmaking. Sure, as a textile designer and trained artist I have done some sort of printing over the years, lino-cut, silk screen, relief printing, stamping, etc. But as a textile designer I have never really focused my creative powers to this medium, which is funny because I have always loved the idea of silk screening my own fabrics, and I design patterns to be printed on fabrics. But I never really played with that medium. What was it that pushed my fabric design into feltmaking? Well that's easy, my love of wool! But as I have been thinking about my art and my personal history, I have begun to wonder about the printed surface again.
A couple months ago I spent some time with my parents talking about a print they have and what they want to do with it, sell or donate? I must say this very large print was a piece of art that hung in our house during my most artistically formative years. Its bold graphic shapes and it bold colors repeated all the things of the colorful graphic art I was exposed to in the late sixties and seventies. As I helped them find a value online,
 we found the artist's website and then watched how Carol Summers actually printed this. We watched this video on his site, fascinated by all the things (unconventional, in my mind) Summers did in achieving his print techniques. From printing on front AND back, laying down heavy ink to get texture, rolling ink on the paper and blocks, spraying the inks with spirits to DYE the paper fibers and use his blocks like jigsaw puzzles, all struck me as something very interesting. Sure I have watched wood block printing in the classical way, where many blocks were carved , then each printed with a different color in register onto paper. My mother did this kind of printmaking. I was never really interested in the slow carving process. (remember - instant gratification me?) So the thought of combining an array of surface techniques really speaks to me. I have watched videos online of amazing artists doing traditional techniques so I may learn a bit of what I like an don't like about the processes. Two amazing videos I found on YouTube are a video of Santa Cruz artist Bridget Henry
 creating her prints. 15 carved blocks printed in registration...sounds to me like screens and traditional hand block fabric printing in textiles. So I kept looking and found more beautiful techniques. This one is a beautiful video of traditional Japanese Ukiyo-e block printing by master printer Keizaburo Matsuzaki. These techniques show me tonal work and the use of thickeners to hold soft water based paint on the surface of a block.
 My own learning process is exciting to me. I feel energized by my own creative process. Equally exciting is what we can learn online - for free! There is so much more out there. I have just returned from an art supply shopping trip, and am gearing up for a trial print run. Stay tuned and I will post my experiments!
A couple months ago I spent some time with my parents talking about a print they have and what they want to do with it, sell or donate? I must say this very large print was a piece of art that hung in our house during my most artistically formative years. Its bold graphic shapes and it bold colors repeated all the things of the colorful graphic art I was exposed to in the late sixties and seventies. As I helped them find a value online,


Saturday, February 9, 2013
Happy New Year and Resolutions
As I started this post a month ago I was wishing everyone a Happy New Year! Now it is days away from Valentine's Day, and snow is coming down as we sit on the edge of an historic New England Blizzard. This past of New Hampshire, often just lies on an outer edge, so we have about 8-10 inches rather than 18-24 inches (thank goodness!) Probably like many of you, I have hopes that this coming year will bring new and exciting opportunities, bringing family and friends close-by, and maybe the strength to stay away from sugary baked goods and get outside and get physical!
In January, I sat with two girlfriends planning a summer vacation. Carole-Ann and Cindy are both artists/painters. CA has been vacationing on Monhegan Island in Maine for years. She goes to paint. She has invited me the past few years to join her. Last year Cindy joined her, their stories and art were, well - inspired. So I promised the both of them, this would be my year to join in. We looked through websites of cottage rentals and found one. My goal for this week in July is to have the mental time and space to be creative. The past two years have found me working at jobs rather than fiber or art or textile design, and my part time jobs have turned into working almost 7 days a week! How did this happen? Opportunities, I guess. Yup and I took them. So my New Year's hope for myself is just the same for you too, probably; hope that my opportunities shift a bit and I can get back into the position of getting income from creating. I am working on it.
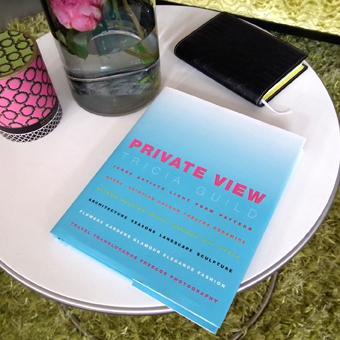
What's on your creative to-do list? While my list is large, time is very small. While that sounds restrictive, I am appeased by the gift Santa Tom gave me. SIX! color inspiration books to keep me going. Tricia Guild of Designer's Guild and Susan Sargent. So how am I going to focus on that week in July? I am planning. When you think of it, it is like ony one of my students who plan all year to come to one of my workshops or Fling or any other spectacular organized event where one is surrounded by joy, creativity, fiber and art. This year for that week in July I will be a student. I am prepping, studying, learning gathering art supplies and then hope to use those 7 days wholly to create, and gather inspiration. I am pondering wood block printing, and silk screening. It has to be relatively portable as well. I want to find out which inks are good for printing on paper and which are good on tees or silk scarves? What kind of paper should I bring and print on?
As a textile designer, my felt making was surface design in fabrication. Now I want to revisit the printed surface process. I loved silk screening in college and never pursued it. I really became intrigued in the idea of wood block printing after I watched a video of wood cut artist Carol Summers making one of his prints.. I grew up in a home that had a huge print of his on the living room wall, it is shown on the retrospective page called Aetna Alive 1964. His process was not at all what I expected from wood cuts, and really resonated with me as how textiles would or could be printed. so I am planning on exploring this style of printing. Maybe while I am planning and working out the process I will also use my images and inspiration from this last October's trip to Italy? My photos from Venice are so spectacular I really need to do something with them as well!
Meantime: here is my latest library shelf full of inspirational reading: (I think there was lots of Ebay and Amazon involved and they are all used, but beautiful condition.)
I would love to hear what some of your visual inspirations are for color and ideas? Care to share?


In January, I sat with two girlfriends planning a summer vacation. Carole-Ann and Cindy are both artists/painters. CA has been vacationing on Monhegan Island in Maine for years. She goes to paint. She has invited me the past few years to join her. Last year Cindy joined her, their stories and art were, well - inspired. So I promised the both of them, this would be my year to join in. We looked through websites of cottage rentals and found one. My goal for this week in July is to have the mental time and space to be creative. The past two years have found me working at jobs rather than fiber or art or textile design, and my part time jobs have turned into working almost 7 days a week! How did this happen? Opportunities, I guess. Yup and I took them. So my New Year's hope for myself is just the same for you too, probably; hope that my opportunities shift a bit and I can get back into the position of getting income from creating. I am working on it.
What's on your creative to-do list? While my list is large, time is very small. While that sounds restrictive, I am appeased by the gift Santa Tom gave me. SIX! color inspiration books to keep me going. Tricia Guild of Designer's Guild and Susan Sargent. So how am I going to focus on that week in July? I am planning. When you think of it, it is like ony one of my students who plan all year to come to one of my workshops or Fling or any other spectacular organized event where one is surrounded by joy, creativity, fiber and art. This year for that week in July I will be a student. I am prepping, studying, learning gathering art supplies and then hope to use those 7 days wholly to create, and gather inspiration. I am pondering wood block printing, and silk screening. It has to be relatively portable as well. I want to find out which inks are good for printing on paper and which are good on tees or silk scarves? What kind of paper should I bring and print on?
As a textile designer, my felt making was surface design in fabrication. Now I want to revisit the printed surface process. I loved silk screening in college and never pursued it. I really became intrigued in the idea of wood block printing after I watched a video of wood cut artist Carol Summers making one of his prints.. I grew up in a home that had a huge print of his on the living room wall, it is shown on the retrospective page called Aetna Alive 1964. His process was not at all what I expected from wood cuts, and really resonated with me as how textiles would or could be printed. so I am planning on exploring this style of printing. Maybe while I am planning and working out the process I will also use my images and inspiration from this last October's trip to Italy? My photos from Venice are so spectacular I really need to do something with them as well!
Meantime: here is my latest library shelf full of inspirational reading: (I think there was lots of Ebay and Amazon involved and they are all used, but beautiful condition.)
I would love to hear what some of your visual inspirations are for color and ideas? Care to share?


Subscribe to:
Posts (Atom)


