I know there are quite a few of you out there who have been pondering this on-line way of learning, we've spoken, but for those of you just in the I wondering phase, I am putting up this post to share a fantastic class and project, and show the progression of 4 weeks! PLEASE NOTE the designs shown here are the property of Deb K.
Deb chose to do the Upholstery Fabric class, and with the goal to do an ottoman at the end of it.
So the first week we did two sessions in one, Color (1 Hour Session 1) and Design (1 Hour Session 2) These two sessions are desktop sharing and slide shows while I speak. And then we discussed the goal, and what to expect for the next session. Deb left that day, with a couple of assignments, one was Color Theory and the other to design her project so I could look at her piece and guide her. Here's what she sent me over that week:
 |
| playing with the color wheel |
 |
| Examples of some of the Theory Color Schemes (one example of many pages of exercises she tried) |
 |
| Inspiration for those designs |
|
|
|
The next class was a demo of laying out and a speedy wet felting demo for the making of the gauge, discussion of gauge, shrinkage and thickness, etc. The next Monday morning I came to my computer to see the following photos of the sample. Now this was not just a sample but would also turn into something...
The next 6 days I received more photos of the 5 total panels needed for Deb's Ottoman.
These five panels show her pieces laid out and dry before felting. I made suggestions about compressing and needling, Deb used a 5 needle punch and compressed by hand. She needled all the detail by hand. we discussed the opacity of the fibers and areas of color, how the detail might look as it felts, did she want it to crinkle or stay straight? these are all points for a felter to be away of how her felt will felt, and shrink and what might happen to the design and details in that process, decisions are made accordingly.
I made a mini wetting and rolling demo, before she began all five pieces to make sure she was comfortable with technique, etc.
We analyzed, I looked at close-ups to see how hard the pieces were felted, especially the detail and line-work, we met again to show and tell how to cut sew and upholster Deb's ottoman. (There were actually two she wanted to do, the first and smaller one, had to be made from her Gauge piece, because as she said she never does something that can't be turned into something she will love, I agree!
We discussed tools, supplies, the best techniques to sew and turn in felt, as well as recognizing what felt will do as well as someone's upholstering tools and type of sewing machine, stapler, etc, so one can be prepared to make style calls like how to attach trims and other embellishments. I use all low tech tools in the studio - no air compressor for staplers, or heavy upholstery sewing machines, we work with what we have!
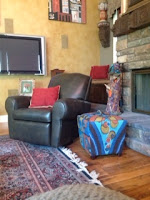
the finished product is stunning, thank you Deb for letting me share your experience with others!
(The mini ottoman is her guage! See why guages are so important?)
PS Her ottoman was one she bought at one of the big chain stores, the mini was a little one inside the bigger one! They were covered in vinyl, and she simple upholstered OVER the vinyl. Easy peasy! She also just began using a new I-pad for the on-line class as well as using it to take her photos for me to see. We used Skype for all 4 sessions.
I hope these photos show how easy and supportive on-line teaching can be, and you too will join the fun!
-Nicole


